Portable Refrigerator
Abstract
Refrigeration is very important especially during summer seasons to cool water and to keep vegetables fresh. This project focusses on making a refrigerator which is not only cost effective but also portable. Thermoelectric module is used to cool water and it is controlled using ATmega16 microcontroller which depends on the temperature input obtained by the temperature sensor (LM35). SMPS is used for supply and DC fan and heat sink is used to dissipate heat. LCD display is used to display the temperature. Finally, the water got cooled up to 9 degrees Centigrade within 90 min.
Introduction
As summers are approaching, everyone would need a refrigerator. In many cases, people cannot afford a regular-size refrigerator. Especially students staying in hostel can neither afford it nor would like to carry such a big appliance along with them when they leave. Also, these refrigerators consume power to the tune of 500W, which is not allowed in most hostels.
Advantages
- Consumes less Power.
- It is Portable.
- Can be made up with things around us.
- Robust.
- Light Weight.
- Cost-effective.
- Eco-Friendly.
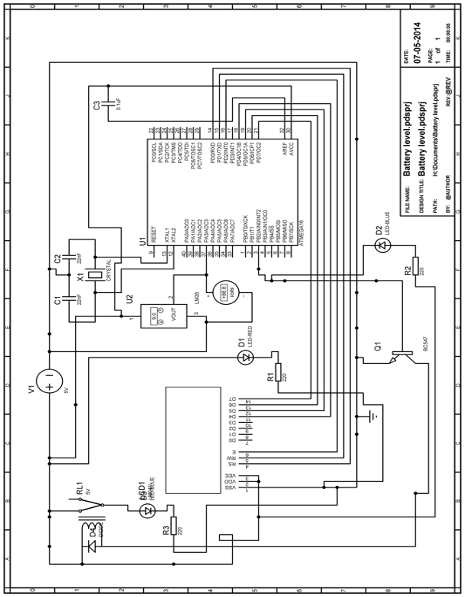
Circuit Diagram
Working
The circuit is built around microcontroller ATmega16, temperature sensor LM35, thermoelectric module TEC1-12706, desktop computer’s SMPS, DC fan, 7-segment display and relay.
The complete circuit is powered by desktop computer’s SMPS. 12V and 5V outputs from SMPS are connected. 5V supply is used to power microcontroller and rest of the circuit, while 12V is used for thermoelectric module and DC fan.
Thermoelectric Module: Actual cooling is done by thermoelectric module TEC-12706. It works on the principle of see beck effect: when current is passed through two dissimilar metal junctions, one junction gets heated up while the other junction cools down. Features
- No moving parts, no noise, and solid state
- Compact structure, small in size, light in weight
- Environmental friendly
- RoHS compliant
- Precise temperature control
- Exceptionally reliable in quality, high performance.
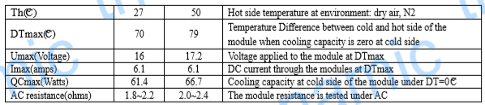
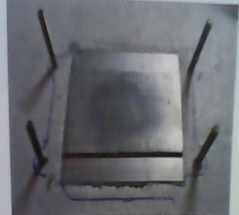
The module is 40X40X3.6mm in size. Although it operates at over 4V-16V, recommended operating voltage is 12V. Depending on the temperature on the hot side, TEC1-12706 is capable transferring 50-60W of heat. Outer construction of this module ceramic and the metallic junctions are inside along two surfaces. The side on which the
model number is printed is the hot side and the other one is the cold side.
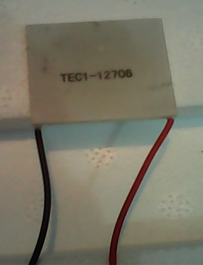
Polarity of the temperature is very important; the red wire should be connected to 12V and back to ground. If the polarity is reversed, hot and cold sides will get reversed as well. Heat produced on the hot side must be eliminated or dissipated, otherwise the module will gets heated up beyond the limit. We can make use of any heat-sink such as the one used in the CPU for the computer. Temperature on hot side has effect on how much heat the module can suck from the cold side. Here we have mounted the DC fan over the heat-sink to dissipate heat more efficiently.

Thermoelectric Module: ATmega16 is a low power CMOS 8-bit microcontroller based on the AVR RISC architecture with throughputs approaching 16MIPS at 16megahertz. ATmega comes with the 16 kilobytes of in system programmable flash, 512 bytes of EEPROM, 1 kilobyte of SRAM, 23 general purpose I/O lines, 32 general purpose working registers, three flexible timers/counters with compare modes, internal and external interrupts, a serial programmable USART, a byte oriented two wire serial interface, a 8-channel ADC with 10bit accuracy, a programmable watchdog timer with internal oscillator and an SPI serial port.
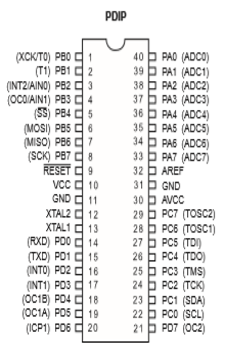
Microcontroller runs at a clock frequency of 8MHz using an internal oscillator. The Thermoelectric module sucks heat from the water inside the refrigerator box and keeps cooling it down. The temperature of water is sensed through a temperature sensor which is interfaced to microcontroller’s ADC pin 37(ADC3/PA3). When the temperature reaches 9deg C or above, relay gets energized and switches ON the thermoelectric module. When the temperature, reaches 5deg C or below, the relay is de-energized and the thermoelectric module is switched OFF.
Port is used for LCD display. Pins PD4-PD7 are connected to the data pins D4-D7 of the LCD and pins PD0-PD2 are connected to the R/W, E & RS of LCD. The LCD displays show the temperature sensed by LM35.
Software
The software program is written in ‘C’ programming language and compiled using AVR studio. The program is burnt in the microcontroller using a suitable programmer.
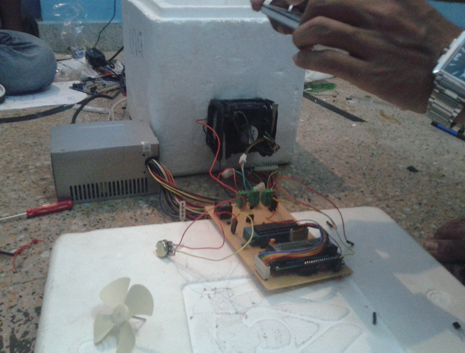
Construction and testing
An actual-size, single-side PCB for the thermoelectric refrigerator circuit and its component layout assemble the circuits on the PCB to minimize any assembly errors. Use IC base for microcontroller. Once the PCB is assembled, power it on the SMPS, the DC fan immediately started rotating. Checking the voltage level at various test points to ensure the circuit is working as required. The Dot board is mounted on the front of the box.
Mechanical Construction
The mechanical construction is the most critical part of the project. The overall body of the refrigerator is a thermacol box. This type of box is easily available in the market. Water is used as coolant because it holds temperature for longer time than air can.
An opening is created near the bottom of the box on one side which should be a little bigger in dimension than the thermoelectric module. An aluminum sheet (Aluminum foil) is mounted over the opening from the outside and ensure that the sheet is firmly fixed and there is no leakage.
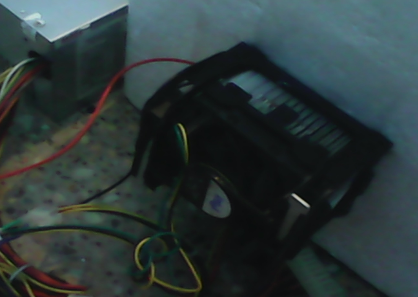
Use a silicon sealant or an adhesive to firmly fix the thermoelectric module over the aluminum sheet. The adhesive should not come between the sheet and the module. Now we need to mount a heat-sink over the thermoelectric module to dissipate from the hot side. Way of mounting the heat sink will depend on the type of heat sink you obtain.
In our case, we used a spare CPU heat-sink which already has a nice base clip. The base clip was screwed and glued to the box, then the heat sink was fitted on the base clip with its holding assembly. We also had the fan attached to the heat sink. The refrigerator should be kept in a well-ventilated place enabling the fan to blow good amount of air on the heat sink.
Let the adhesive dry properly. For silicone, it takes about 40-50 minutes pour in a small amount of water inside the box and see if there is any leakage in the box in case of leakage, try putting more silicone to fill in the voids. Water level should be equal to the height of opening, so that maximum water comes into contact with the cold side of TEC module.
Water is a good conductor of heat only when it is in liquid form. Once it turns into ice, it will indeed blocks the transfer of heat. As said above, cold side can go well below 0deg and water near the opening will turn into ice in an hour or two. Once that happens, remaining water in the box will never get colder. Hence we have to stop the formation of ice near the opening.
Simple way of doing it is by using an aquatic air pump. Pipe coming out of the air pump is inserted to the respected box through a small hole on the top. The opening of the pipe from where the air blows out is facing the cold portion of the thermoelectric module which is connected to the aluminum plate. In this way, air bubble do not let the ice to form at the opening. Effectively it creates a motion or water current and help all the water to reach the same temperature.
As there is water at the bottom, over all humidity inside the box will increases or goes high. Hence food items such as vegetables should be preferably stored in air tight container or bags, excessive moisture can ruin them. At least once a week, you should unplug the refrigerator and change water inside the box after cleaning it thoroughly.
Results and Conclusions
The Temperature of 9 degrees was obtained within 90 minutes. The thermoelectric module was allowed not to get cool down below 5 degrees. In future, this model can be used by students in hostel, to store medicines, liquid cooling, food service refrigerator, portable cooler box for cars, CPU cooler and scientific instrument and temperature stabilizer.
Sunny Arokia Swamy Bellary
Research Engineer - Robotics
EPRI Engineer | AI Enthusiast | Computer Vision Researcher | Robotics Tech Savvy | Food Lover | Wanderlust | Team Leader @Belaku | Musician |