1. Basic concepts of Images
In this project our tasks are the following
- Read the image
- Resize the images
- Grayscale the image
- Rotate the image by 45 degrees anti-clockwise
- Convert to black and white image
- Save the black and white image
We achieve this using OpenCV commands:
Introduction to OpenCV
OpenCV or Open Source Computer Vision Library is the largest computer vision library currently available in terms of number of functions it holds. It is freely available for commercial and academic purposes. It supports various languages such as Python, C++ and Java. Some of the application area includes and are not limited to Facial recognition, Segmentation, Augmented Reality, Gesture recognition etc. As we see learning opencv is very important hence we implement all our projects in opencv and python. We first install opencv using pip install opencv-python or to install on Ubuntu/MacOS and Raspbian/Raspberry Pi follow this url. Here I’m using 4.2.0. To check this execute the following lines.
import cv2
print(cv2.__version__)
Read the image
Raw building blocks of all the images are Pixels (Picture Elements). An image is made up with a grid with numbers just like a numpy array. Each number represents a pixel intensity as shown in figure below.
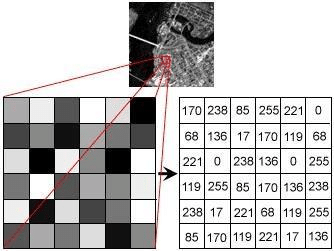
Here the image is a grayscale hence it shows a 2D martix. If the image is color then it shows a 3D martix with RGB values. In order to read image using opencv we use cv2.imread() function. Please note that the image should be placed in the current working directory or absolute path should be provided.
image = cv2.imread('lena.png')
After reading the image, the first check would be to know its dimensions. To check the dimensions we use shape object which gives the dimension. For example, A 800 x 600 images will have 800 columns and 600 rows. Here number of column corresponds to width and number of rows to height of an image. Also, for the same example the number of pixels in that image is 800 x 600 = 480000 pixels. To view the shape enter the following command in console and it prints the image shape.
print(image.shape)
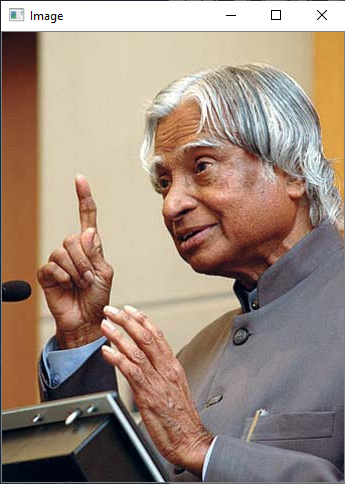
One of the more important aspect in image processing is to view the image after it is processed. To achieve this opencv provides a cv2.imshow() function to display image in a window. We use cv2.waitKey() after imshow as it is a keyboard binding function which takes milliseconds as arguments. This function waits for any keyboard event for the specified milliseconds. If zero is passed then it waits indefinitely until a key is pressed. On running the code below the screenshot of the window will look like this,
cv2.imshow("Image", image)
cv2.waitKey(0)
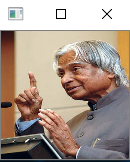
Resize the image
Resizing images plays an important role in image processing. It is necessary when there is need to increase or decrease the total number of pixels. Increasing size might be used when you need to fit the image to the screen and we often use decreasing pixels as it is faster to process on lesser pixels. More often in deep leaning applications, we use resizing to match the size of the network. In order to resize the image we use cv2.resize which takes parameters such as image and new width and height of image and outputs resized image
resized_im = cv2.resize(image, (128, 128))
cv2.imshow("resized", resized_im)
cv2.waitKey(0)
Grayscale the image
Grayscale images are a monochrome 2D images with pixel values ranging from 0 to 255 for a 8 bit image. In order to change image from color to grayscale we use cv2.cvtColor() which is used to convert any image from one color space to another. It takes two arguments, source image and color space. Please note that opencv follows the BGR ordering rather than RGB because few years ago when opencv was developed the standard was BGR ordering.
gray_im = cv2.cvtColor(image, cv2.COLOR_BGR2GRAY)
cv2.imshow("Gray", gray_im)
cv2.waitKey(0)
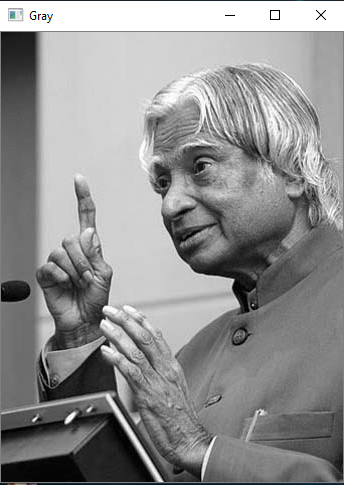
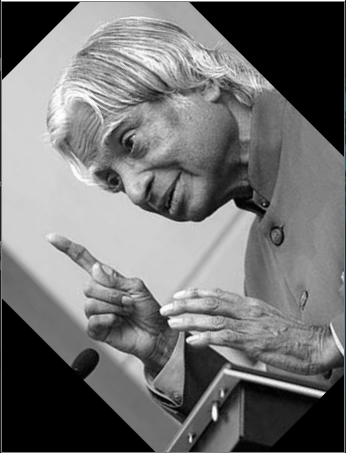
Image rotation
Image rotation is a common image processing technique with its applications in matching, alignment and other image based algorithms. More importantly it is used as data augmentation technique when there is less data available. It is one of the geometric operation performed on images that is by rotating the image at an arbitrary angle. We use cv2.rotate() method to rotate a 2D array in multiples of 90 degrees.
rotate90_im = cv2.rotate(image, cv2.cv2.ROTATE_90_CLOCKWISE)
cv2.imshow("Rotate90", rotate90_im)
cv2.waitKey(0)
Rotation for any angle $ \theta $ is achieved by the transformation matrix of the form,
$$ \left[\begin{matrix}\cos \theta & -\sin \theta\\ \sin \theta & \cos \theta\end{matrix}\right] $$
So for opencv implementation we first compute the center point and pass it as an argument to cv2.getRotationMatrix2D() with rotation angle. Later this transformation matrix is passed through cv2.warpAffine() and also image as input. To achieve this the following code needs to be executed.
rows, cols = gray_im.shape
M = cv2.getRotationMatrix2D((cols/2, rows/2), 45, 1)
rotate_im = cv2.warpAffine(gray_im, M, (cols, rows))
cv2.imshow("Rotate45", rotate_im)
cv2.waitKey(0)
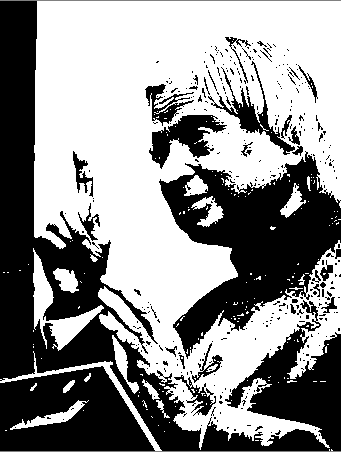
Convert to Black and White
There are various methods for converting a color image or grayscale image to binary. A simple method is known as thresholding or binary threshold where pixels are either 255 or 0 sometimes 0 or 1. In many cases its either black (0) or white (1 or 255). So we use cv2.threshold() function with inputs as image, threshold value and the black and white image is returned as output.
threshold_value = 127
ret_val, bw_im = cv2.threshold(gray_im, threshold_value, 255, cv2.THRESH_BINARY)
cv2.imshow("Bw_image", bw_im)
cv2.waitKey(0)
Save image to file
Final and most important step is to save the image to any storage device. The following code will save the bw_image according to the specified format in current working directory.
cv2.imwrite("bw_image.png", bw_im)
Entire Code
import cv2
# prints the opencv version on console
print(cv2.__version__)

# Read the image
image = cv2.imread('lena.png')
cv2.imshow("Image", image)
cv2.waitKey(0)

# Resize the image
resized_im = cv2.resize(image, (128, 128))
cv2.imshow("resized", resized_im)
cv2.waitKey(0)

# Convert to grayscale
gray_im = cv2.cvtColor(image, cv2.COLOR_BGR2GRAY)
cv2.imshow("Gray", gray_im)
cv2.waitKey(0)

# Rotate about 45 degrees anti-clockwise
rows, cols = gray_im.shape
M = cv2.getRotationMatrix2D((cols/2, rows/2), 45, 1)
rotate_im = cv2.warpAffine(gray_im, M, (cols, rows))
cv2.imshow("Rotate45", rotate_im)
cv2.waitKey(0)

# Convert to BW image
threshold_value = 127
ret_val, bw_im = cv2.threshold(gray_im, threshold_value, 255, cv2.THRESH_BINARY)
cv2.imshow("Bw_image", bw_im)
cv2.waitKey(0)

# Save the image
cv2.imwrite("bw_image.png", bw_im)